Delicious Discards
Making meals From mainly Scraps
by April Thompson
Food scraps are no longer relegated to just making soup, stock and sauces that hide their true nature. Creative chefs are reawakening to the possibilities of skins, cores, rinds and other parts we’ve needlessly been throwing away, with startling results.
“Cooking with scraps is good for the planet and good for the pocketbook. Forty percent of food produced goes uneaten, unnecessarily filling the landfill with hundreds of billions of dollars of food,” says Lindsay-Jean Hard, a chef in Ann Arbor, Michigan, and the author of Cooking With Scraps: Turn Your Peels, Cores, Rinds, and Stems into Delicious Meals.
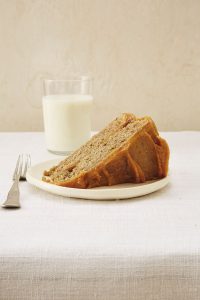
Yet the real driving force behind Hard’s unusual, scrap-based recipes is the joy of creativity and innovation. “It’s fun to challenge yourself to create something delicious out of something no one would think edible, like my banana peel cake,” says Hard.
Mads Refslund, a Danish chef living in New York City, seeks nature in food by cooking and serving it on the plate. “In nature, there is no ugly, no trash, just cycles of change. Using all the parts is a way of respecting the plant, the fish, the animal and its life,” says the co-author of Scraps, Wilt & Weeds: Turning Wasted Food into Plenty.
Tama Matsuoka Wong, forager and coauthor of Scraps, Wilt & Weeds, points to the cultural relativism of cooking, noting that our ancestors or other cultures may think that modern Americans are throwing away the best parts of our food. “Some of the best flavor and nutrients can be found in vegetable, fruit and fish skins that often get discarded,” says Matsuoka Wong.
Both Scraps, Wilt & Weeds and Cooking with Scraps are intended as reference guides to provide inspiration to home chefs, rather than rigid cookbooks to be followed with precision. Matsuoka Wong suggests trying to work with the ingredients at hand, using substitutions as needed, instead of buying an ingredient just to follow a recipe.
Cooking from scraps requires a shift in mindset about our food and a new mindfulness about our habits in the kitchen, says Matsuoka Wong. “Before automatically throwing something away or composting, pause and think, what might I do with this?” she says.
Hard suggests choosing one new ingredient at a time to work with, old bread being an easy one to start with. “Stale bread can easily be transformed into breadcrumbs and croutons that can add nice texture to a lot of dishes,” says Hard.
“Nail a couple things you can make out of anything, like fried rice or frittatas, which are both very accepting of most any ingredient you add,” says Matsuoka Wong. Hard agrees that simple, hearty dishes like layered casseroles or tasty tempura can be great ways to clean out the odds and ends in the crisper.
Sometimes the toughest ingredients can yield the tastiest meal. Hard admits to having been stumped by what to do with the non-fleshy part of artichoke leaves, which can be tough and bitter, until she developed a recipe for artichoke leaf nachos.
Edible weeds, leaves, stalks and stems of all kinds, including celery, asparagus ends and carrot tops, make for great pesto, which is itself a versatile ingredient—great for sandwiches, dips, pastas and more—and it freezes well, Hard says. Fish scales can be fried and eaten like potato chips; they are a crunchy bar snack in Japan, notes Matsuoka Wong. Fish carcasses or shrimp shells can also be boiled down into stock for risotto or seafood chowder, suggests Hard.
Fruit cores can be boiled into sweet syrup for cocktails or non-alcoholic refreshments, or distilled down into vinegars. Fruit peels can be crisped up into a healthy snack or boiled into a tea. Hard likes to infuse tequila with beet peels for a dramatic look and a little extra flavor. Fruit or vegetable tops such as pineapples, strawberries, cucumbers and leftover herbs can be used to infuse water or vinegar. Water from canned beans, known as aquafaba, is a great stand-in for egg whites to make everything from homemade vegan mayo to fudgy brownies.
“Cooking with scraps shouldn’t be intimidating or overwhelming or feel like a chore: They’re just ingredients,” says Hard. “Te more you cook using these recipes, the more familiar the concepts will become, and you’ll realize how easy it is to adapt them to make them your own.”
April Tompson is a freelance writer in Washington, D.C. Connect at AprilWrites.com.
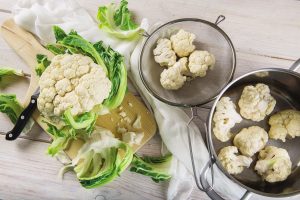
Cauliflower Core Cacio e Pepe
Yields: 2 servings
Cauliflower replaces pasta in this take on the classic cacio e pepe (cheese and pepper) pasta. It’s an easy recipe that takes only 25 minutes when using a spiralizer—a vegetable spiral slicer that can turn both tougher and not-so-tough vegetable parts into beautiful, noodle-like strands (or other shapes). Te addition of green and red pepper seeds adds a little spice.
4 lg cauliflower cores, lightly trimmed of the most fibrous outer parts3 Tbsp unsalted butter
¼ cup leftover seeds and white inner veins from any pepper, such as bell peppers, jalapeños, serranoes, poblanos (Optional, and no need to be too exacting about the amount.
This is waste: If you have it, use it.)
1 tsp freshly cracked black pepper
1 cup crème fraiche or heavy cream
½ cup Parmesan rind broth or other vegetable broth
¾ cup finely grated Parmesan cheese
⅓ cup finely grated pecorino Romano cheese
½ tsp kosher salt
Spiralize the cauliflower cores into a spaghetti shape using the thicker noodle blade of a spiralizer.
In a medium saucepan over medium heat, melt the butter to coat the pan. Add the pepper bits and cracked pepper and sauté for two minutes, until the pepper is toasted and aromatic. Mix in the crème fraiche and broth and cook, stirring for about five minutes until the sauce is slightly thickened.
Add the cauliflower “spaghetti”, stirring occasionally until just cooked, about two minutes. Transfer to a large bowl and immediately add the Parmesan and Romano. Toss until the cauliflower is coated and not clumping.
Serve right away, adding more pepper, salt and cheese to taste.
Excerpted from the book Scraps, Wilt & Weeds: Turning Wasted Food Into Plenty by Mads Refslund and Tama Matsuoka Wong.
Banana Peel Cake With Brown Sugar Frosting
For one, two-layer cake:
Peels from 2 very ripe bananas, stem and very bottom discarded (see note)
½ cup unsalted butter, softened, plus more for buttering the pans
1½ cups granulated sugar
2 large eggs, separated
½ cup buttermilk
1⅔ cups cake flour, (gluten-free if needed), plus more flour for flouring the pans
1 tsp baking soda
¼ tsp baking powder
½ tsp fine-grain sea salt
For the frosting:
½ cup unsalted butter
1 cup packed light or dark brown sugar
¼ cup milk, 2 percent or higher
1¾ to 2 cups powdered sugar, sifted
Preheat oven to 350° F. Cut the banana peels into 1-inch pieces and place them in a small saucepan with 1 cup water. Bring to a boil over medium-high heat, then reduce heat and simmer for 10 minutes. Remove pan from the heat and allow the mixture to cool slightly, then drain the banana peels, reserving a cup of the cooking water.
Butter and flour the sides of two 8-inch round cake pans and line the bottoms with parchment paper. Butter and flour the pans again to coat the paper.
Transfer the peels and the cup of cooking water to a tall, narrow container and purée with an immersion blender or a mini food processor until completely smooth.
Cream together the butter and sugar in a large bowl using an electric mixer or a wooden spoon until pale and fluffy, 3 to 5 minutes. Add the egg yolks one at a time, mixing until incorporated, and scraping down the sides of the bowl after each addition. Mix in the banana peel mixture, then stir in the buttermilk until well combined.
In a medium-size bowl, whisk together the flour, baking soda, baking powder and salt. Add the dry ingredients with the butter mixture and stir gently, just until combined.
Put the egg whites in another bowl (make sure it’s dry) and whisk until soft peaks form, either by hand or with the whisk attachment on an electric mixer. If using an electric mixer, start slowly and gradually increase speed to medium-high.
You’re done when you pull out the whisk or beater and a soft peak is formed, but immediately collapses. Gently fold the egg whites into the batter and divide the batter evenly between the two prepared pans.
Bake, rotating the pans halfway through, until the tops are golden and a toothpick inserted into the center of each cake pulls out with dry crumbs rather than wet batter, about 25 minutes. Let the cakes cool completely in the pans.
When the cakes are cool, make the frosting. Melt butter in a medium saucepan over low heat. Stir in brown sugar and cook, stirring constantly, for 2 minutes. Stir in the milk, raise the heat to medium-high and cook, stirring constantly until the mixture boils. Remove from the heat and let cool until lukewarm. Gradually whisk in one cup of the powdered sugar, beating until smooth. Add the remainder of it if the frosting is too loose. Use the frosting immediately as it will begin to thicken and stiffen as it sits.
To remove the cake from the pans, invert one cake pan on a serving plate, lift off the pan and peel off the parchment. Repeat for the second cake pan. Put one layer of the cake on a serving platter and spread about one third of the frosting evenly over the top. Set the other layer on top, and spread the remaining frosting over the top and sides.
Note: Banana peels contain some of the same proteins found in latex and could cause an allergic reaction. Those same proteins might also make your immersion blender feel slightly gummy to the touch. Rub the surface down with cooking oil before washing it.
Excerpted from Cooking With Scraps: Turn Your Peels, Cores, Rinds, and Stems into Delicious Meals by Lindsay-Jean Hard.
<


